

how to change dpi in illustrator
A lot of thought goes into creating branded packaging - choosing the right kind of printing method, the design itself, and the meticulously considered add-ins.
But the one thing that really sets quality packaging design apart from mediocre alternatives is often overlooked: the quality of the design file itself.
More specifically - the design file must be at least 300DPI.
Here's why it matters so much.
DPI - what is it, and why is it so important?
Let's start with the basics - what is DPI in the first place?
DPI stands for "dots per inch".
The higher the DPI, the sharper the image is. 300 DPI is the suggested minimum resolution for a high resolution, qualitative output specifically in print. The result is that you get a crisp, printed package.
The fewer dots per inch, the less detail you can see in the design itself, and the lower the DPI, the more pixelated and blurred the image can be.
Take these, for example:
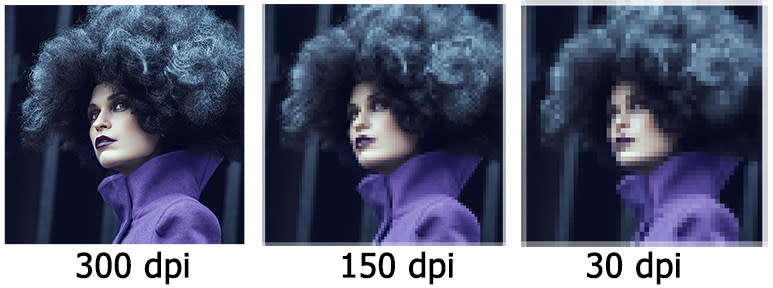
You can see that the lower the DPI, the more blurry it becomes.
This matters so much because the packaging is a direct representation of your brand, as well as the product inside.
If the packaging appears unclear and pixelated, it conveys a message of lack of attention to detail, and as a result, a lack of quality.
Whereas if the product packaging image is sharp, and if done right, the packaging design can become one of your biggest branding mascots, since it is often the first point of contact that your customer has with the product.
With high quality packaging, including high quality images, it's easier for consumers to justify a higher price point than with a low quality packaging print.
How to implement 300 DPI
The knowledge of needing at least 300 DPI in your design isn't enough - you need to make it happen as well. So we're on to the next step - how to implement 300 DPI.
To ensure that you're producing a print file that meets the 300 DPI threshold, you'll have to be working in a design editing program. The most common platforms that are used include Adobe Illustrator and its free, open-source alternative - Inkscape. Of course, there are plenty of others at your disposal.
To make sure that your design is in 300 DPI in Adobe Illustrator, go to Effects -> Document Raster Effects Settings -> check "High Quality 300 DPI" -> click "OK" -> save your document. DPI and PPI are the same concepts.

When you've got your file prepared at 300 DPI, simply export as a .pdf or .ai file to submit to your packaging provider.
How to work with your packaging provider
When working with your packaging provider, to make things as smooth as possible, there are a few things to keep in mind.
You will have to provide the logo and any other images that have to be on the packaging in at least 300 DPI. You should already come to the table with a concept that you want to develop for your packaging. That includes themes, text, colors, and more.
Your packaging provider, such as ourselves, will help you choose the right kind of box to use, keeping a plethora of factors in mind, such as:
- Lowest possible shipping prices
- How to best secure the products being shipped to keep them safe
- How to provide the best possible unboxing experience - and how the recipient will discover the product
Pro tip: Don't go too crazy with the designs on the first round. Everyone thinks they want an Apple iPhone box until they realize how much it actually costs. Browse Pinterest for simple designs that are imaginative, creative, but also wouldn't break the back (cough Arka can help you with some recommendations too).
Other crucial things to know about packaging design
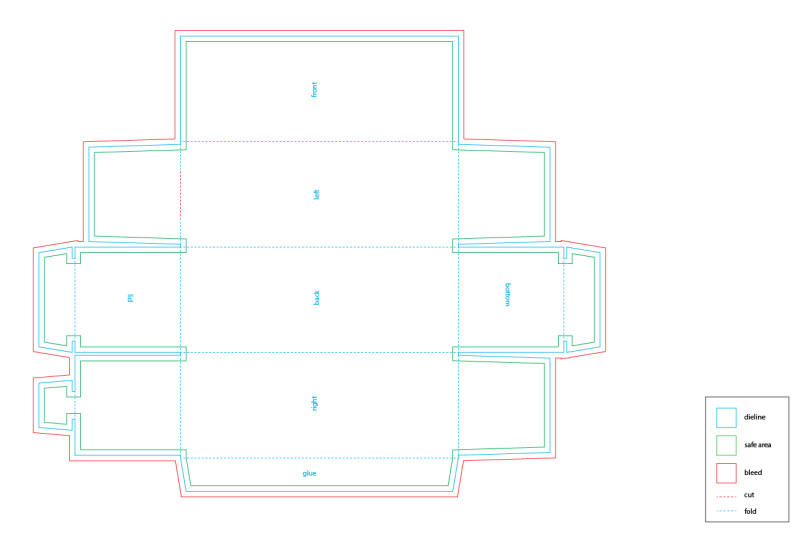
Dielines - this is essentially the blueprint of your design. It is the flat representation of the end product that demonstrates where the cardboard has to be cut and creased, in order to then turn it into a 3D product.
Bleed - refers to the portion of the design that is created to go outside of the boundaries that are intended for the packaging, ensuring that if there is a slight deviation from the cut, then the edges of the design won't show through.
All of these elements should be reflected in the final design print file that you provide the printers with. Arka provides this all for you.
In order to make sure that everything is going to be printed as you like, Arka provides a design proof - this is your packaging design example that demonstrates what your design will look like on the finished product. You get to approve your box proof before it goes into printing!
Pro tip: Your design will vary depending on what kind of packaging solution you choose. To get a better idea of the different kind of packaging options, take a look at this comprehensive guide.
Key takeaway - 300 DPI
The main thing to keep in mind to creating branded packaging is to ensure 300 DPI image quality when handing over your design files.
That way, you get the best possible results, the highest possible quality, and the happiest possible customers.
Arka is a packaging expert, and if you have any additional questions about packaging and preparing yourself for branded packaging, we would love to hear from you. Get in touch with us at support@arka.com and keep an eye on our blog for more packaging advice.
how to change dpi in illustrator
Source: https://www.arka.com/blog/300dpi#:~:text=To%20make%20sure%20that%20your,pdf%20or%20.
Posted by: montanodrationotled.blogspot.com
0 Response to "how to change dpi in illustrator"
Post a Comment